I will kick off this post with a quick disclaimer: I am not an expert diaper cake maker. I have made two. They turned out well and I've been asked for "instructions" and "help" for others who want to take a stab. Another disclaimer is that I am in no way, shape or form crafty or creative so that goes to show how EASY this is.
Like I said, I've only made two and I made them each a bit differently. For this past weekend, for Kristen's shower, I took some pictures of the work-in-progress and can now try to guide my readers along if they want to try their hand at the diaper cake.
I started with a round piece of cardboard for the base - purchased at Michael's or Hobby Lobby (I can't remember). I covered with with tissue paper - you can really use whatever you want - wrapping paper, tissue paper, paint the base, etc. I just taped down the tissue paper and tried to smooth it over so it would lie flat and not look sloppy.
Next, I rolled the diapers and rubber-banned them so they'd stay rolled. I used Pampers Swaddlers in the Newborn size, but you can really use whatever you want. Keep in mind the larger the size, the taller and thicker your diaper cake will turn out. Also, take care to roll the diaper design (if there is one) so that only the white part will show on the outside.
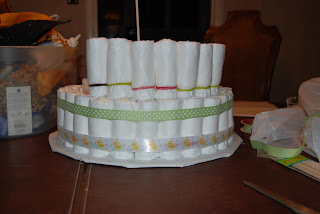
I picked up three styrofoam discs - I stacked them on each other at the store (Michael's) to see if they were a good size/proportion to look like a cake. I glued the biggest one to my cardboard base with a mini hot blue gun. Then, I started gluing the rolled diapers against the styrofoam disc. As you can see in the photo, they are not perfectly aligned. You have to keep an eye on them and try to get them as close together as possible so there are no gaps where you can see through them into the center of the cake. Also, it's important to make sure they are as lined up as possible. You'll have an opportunity, however to help straighten them out when you attach the decor and ribbon later. I had to hold them in place a little longer than I would have liked while the glue hardened up a bit because the styrofoam disc was short. If your mom-to-be is registered for the Diaper Genie you can also buy the refill things which are round and use those for a base. I did that last time. Anything round will work, really.
When the first disc was fully surrounded by diaper rolls, I crumbled up a few sheets of tissue paper and stuffed them in the middle to fill up the space. Then, I placed the next (smaller) disc on top and lined it up at just above the level of the first layer of diaper rolls as you can see in the photo. I stuck a wooden dowel (purchased at Michael's) in the middle to help hold everything in place. I glued the disc to the dowel so that it wouldn't budge, too. I waited for this to fully dry and harden before I started gluing the next round of diaper rolls to the second styrofoam disc. I tried to keep the hot glue on the rubberbands rather than all over the diapers, but sometimes it didn't work out that way. I wanted to ensure the mom-to-be can use as many of the diapers as possible when she takes the "cake" apart.
Although I wanted to wait until all three layers of diapers were done before I started to decorate, I got impatient because I ran out of diapers. So, as you can see, I wrapped ribbon around the diapers - the one on the bottom covers up the rubber bands and the one on the top helps to even out the layer of diapers and kind of sucks it in nice and smoothly.
So, back at it the next day, after a trip to Target for more diapers, I finished off layer number two and stuffed the center with more tissue paper and set the last styrofoam disc. While I was waiting for that to dry, I tied more ribbon around layer 2. Again, taking care to cover the rubberbands and tighten up the layering of the diapers.
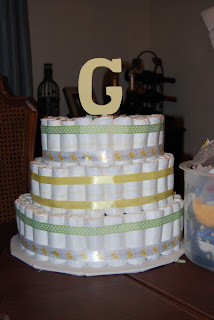
I did the same with the third and final layer - and finished it off with the same "pattern" of ribbon I did on the first layer. Of course, your decor, ribbon patterns, choices, etc. are all up to your creative mind. For this particular cake, I used a wooden G that I picked up at Michael's and painted yellow as the parents-to-be have affectionately named their baby, "Baby G". I stuck the G on the wooden dowel, stuffed some more colored tissue paper in the top of the cake to fill it up a bit and my diaper cake was ALMOST done. But alas, it needed more flair.
I bought a few baby items at Babies R Us - some pacifiers, some socks, a rattle, a sippy cup, some rubber duckies, etc. I carefully placed these around the cake and eventually hot glued or tied them all on. I tried to buy quality "flair" to ensure that mom-to-be will use them vs. toss them because they are crap. If the items weren't easy glued on (as in, they'd be ruined if glued), I tried to tie them with ribbon and then glue the ribbon to the cake. I also used some wire ribbon to tie a bow at the bottom of the G and also another decorative bow that I glued to the second layer of the cake for some added pizazz. Riley was a big fan of the giraffe rattle featured on the top of the cake - he wanted it as his own.
So, ta-dah! There is my latest (and second ever) diaper cake! It's really not that hard, you just need to get creative. In one sitting, this would have taken about 3 hours. Rolling diapers and then gluing them on takes the longest amount of time - all which can be done in front of the TV with a good movie on! I had to stop a few times because I ran out of diapers and hot glue and I was working on it at night so I did it in a handful of 30-45 min intervals. It made for a great gift and shower decoration.
Here is a photo of the one I made last year for comparison:


No comments:
Post a Comment